What to do with leftover mushrooms and blue cheese…

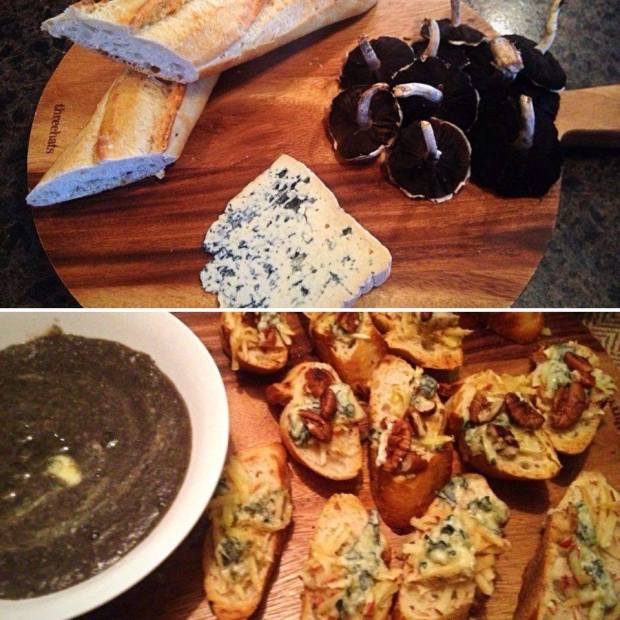
So with a stack of mushrooms needing to be eaten and a wedge of beautiful blue cheese sitting in the fridge, I was scratching my head trying to think of a great way to serve them that would include plenty of vegetables and maybe something fermented. Bingo! Calzone…

Sourdough pizza dough started the day before using just flour, salt, olive oil and water, wrapped around a mixture of mushrooms, silverbeet, cottage cheese and blue cheese and cooked on a hot BBQ plate. Perfect.

calzone

1 quantity pizza dough

1 tablespoon olive oil

1/4 cup tomato paste/puree

8-10 field mushrooms, wiped and roughly chopped

1 brown onion, chopped

1 tablespoon fresh thyme

8-10 silverbeet/spinach leaves washed and chopped

150 grams cottage cheese

small wedge blue cheese to taste (I used about 50 grams)

salt and pepper


Heat the olive oil in a frying pan and gently fry the onion. Add mushrooms and cook until soft. In a separate bowl mix the thyme, silverbeet, cheeses, salt and pepper. Stir through the mushroom mix.

Divide the dough into 4 pieces and roll into rough rectangle shapes. Spread half each rectangle with the tomato paste or puree, top with a quarter of the mushroom mixture and fold the dough over. Crimp the edges to seal. Slide the calzone onto a hot BBQ grill plate, close the lid and cook for 6-7 minutes until brown. A pizza oven would be even better, and a hot oven would work just fine as well.

Serve with a green salad and enjoy.

Serves 4

Autumn calls…

Shopping at the local farmers market this morning I came across these little beauties; a huge pot of field mushrooms that looked as if they had just that minute been picked. My mind immediately made the leap to Jamie Oliver’s insanely good Mushroom Soup recipe, and one trip to our incredible local French patisserie L’amour en cage for baguette and Bleu Auvergne cheese meant we were set for an epic meal.

I’m constantly reminded how lucky I am to live to live in a place where fresh, quality food is accessible, affordable and valued by so many passionate foodies (like me!)

mushroom dinner


Lemon & Raspberry Tart (raw and vegan)

This tart is the culmination of lots of experimentation, and I love the way I’ve managed to get the lemon and raspberry flavours swirled together. It is extra versatile because as well as being grain, dairy, gluten and refined-sugar free, it is also nut-free (very important in our household!) It is a great recipe to take to a pot-luck dinner or shared lunch, as it is impressive, tasty, and goes a long way.

IMG_0087

For the base:

45 grams cashew nuts

45 grams sunflower seeds

45 grams pumpkin seeds

85 grams dates

25 grams desiccated coconut

1-2 tablespoons water (if you need to make the base slightly stickier)


For the filling:

350 grams cashew nuts, soaked in cold water for 2-6 hours

2 tablespoons cacao butter, melted

3 tablespoons coconut oil, melted

1 teaspoon vanilla paste

3 tablespoons honey

1/2 teaspoon salt

Juice and zest of 2 lemons

5 tablespoons dehydrated raspberry powder


To make the base, blitz all the ingredients together in a high-speed blender until they form a sticky mixture. Spread this over the base of a spring-form tin lined with baking paper. Refrigerate until needed.

To make the filling, drain the cashews and blend them with the cacao butter, coconut oil,vanilla, honey and salt until really creamy. Separate the mixture into 2 bowls.

Add the lemon juice and zest to one half of the cashew mixture and blend well. Add the raspberry powder to the other half and blend well.

Dot spoonfuls of the lemon and raspberry mixtures all over the base, then swirl them together with a spoon. Smooth the mixture down as much as possible without spoiling the marbled effect.

Freeze the tart for at least 1.5 hours, then pop the base out of the tin, cut the tart into slices, and serve with fresh raspberries. Serves 10-12.


Happy Easter!

I’ve been experimenting with sourdough hot cross recipes, and reckon I’ve finally cracked it (just in time for Good Friday).

Sourdough can be a healthier option for bread products, as it’s fermented which causes it to have a lower G.I, which reduces those blood sugar spikes that bread can cause. It also seems to be better tolerated by gluten-intolerant folks (check out this article which explains why people who can’t eat gluten can eat sourdough).

Here’s how I make my sourdough hot cross buns but be warned; you need to start a day and a half before you want to eat them.

hot cross buns

For the buns:

2 cups sourdough starter (made from 1/4 cup starter + 1.5 cups plain flour + 1 cup water)

1.5-2 cups plain flour

1/4 cup sugar (or brown sugar for a darker bun)

1/4 cup melted butter

1 egg

3/4 teaspoon salt

1.5 teaspoons mixed spice

1.5 teaspoons cinnamon

1/2 teaspoon ground cloves

1 cup sultanas

For the crosses:

3 tablespoons flour

2 tablespoons icing sugar

1/2 teaspoon vanilla essence

enough water to make sticky mixture, about 2-3 tablespoons


For the glaze:

1 tablespoon honey

1 tablespoon golden syrup

1.5 tablespoons boiling water


Make the sourdough mixture by combining the starter, flour and water and leaving for 8-12 hours until bubbly. Or you might already have 2 cups of starter ready to go, in which case you can go straight to the next stage.

Using a dough hook if you’re lazy like me, or you can knead by hand, mix the sourdough mixture with all the ingredients except the sultanas until smooth and stretchy. Vary the amount of flour to get the consistency that works for you.  Fold through the sultanas, then leave covered in a warm spot for several hours until doubled in size. I usually make the dough in the morning, leave it all day, then roll into buns at the end of the evening.

Roll the dough into 12 balls, space them evenly in a roasting tin, and leave covered again until double in size. I like to leave them overnight so they’re ready to bake in the morning.

At this point, you might like to add crosses. I just put all the ingredients in a small zip lock bag and mush it around until it’s the consistency of a thick paste. Then I snip one bottom corner off the bag and hey presto-a piping bag! Pipe crosses across the top of the buns.

Bake the buns at 200 degrees C for about 15 minutes, or until golden. Immediately after removing from the oven, brush over the glaze, which is made by simply mixing the 3 ingredients until well combined.

Best served hot from the oven and slathered with butter.


Peanut, oat blueberry slice

This recipe is based on one by Emily Van Euw,  but where she uses whole berries I prefer to make a raw berry jam and drizzle it all with raw white chocolate.

The slice is filling, nutritious and delicious, and transports reasonably well. I recommend you try it!

oat slice

1 cup rolled oats (not the wholemeal ones)

3 tablespoons coconut flour

1/2 cup desiccated coconut

1/2 cup peanut butter

1/3 cup coconut oil

1/4 cup rice syrup

1 teaspoon vanilla paste

3/4 cup fresh or frozen blueberries

1/4 cup water

1.5 tablespoons chia seeds

1 tablespoon honey

3 tablespoons cacao butter (optional)

3 tablespoons maple syrup (optional)

To make the base, give the oats a very quick pulse to make them a bit finer but still chunky. Add the coconut flour and coconut and mix. In a saucepan, melt the coconut oil, peanut butter, rice syrup and vanilla. Stir the wet ingredients into the dry and push down into a loaf tin (I love to use a silicon one; the slice comes out really easily). Refrigerate while you make topping.

To make the topping, grind the chia seeds using a blender, coffee grinder or mortar and pestle until very fine. Mix the ground chia with water and leave to sit for a few minutes to absorb. If using frozen berries allow them to defrost. Blend the berries with the honey until smooth, then mix through the chia mixture. Spread over the oat base and place back in the fridge.

The slice is delicious just like this, but for an extra bit of decadence simply melt the cacao butter and maple syrup together and drizzle over the slice.

Slice when cold and keep in the fridge.


Self-Crusting Vege Pie

I have so many friends who tell me, “I don’t want to be vegetarian, but I do want to cook more meals without meat”. This recipe is for them! It’s a family favourite that’s been doing the rounds for years. It is versatile, easy, delicious, and so filling that you never miss the meat. In fact, I’ve served it up to the most ardent meat-eaters and have won every one of them over.

Traditionally, the pie calls for 1 cup of cooked, chopped spinach, but I like to mix it up depending on what is in season (and in my fridge). So in summer I might add corn, tomato and grated courgette, and have been known to throw in left over roast veges from the night before’s dinner in winter.

Here is the basic recipe; feel free to adapt it to suit yourself:

4 eggs

2 cups milk

1/2 cup plain flour

1/2 teaspoon baking powder

1 cup grated cheese

salt and pepper

1 -2 cups chopped/grated vegetables

Whisk eggs and milk together then add remaining ingredients. Pour into a well-greased pie dish and bake at 200 degrees for about 45 minutes or until set and brown. Cut into slices and serve with salad or vegetables.

The pie is also delicious cold for the next day’s lunch, and is ideal for taking on picnics.

Cacao Toasted Muesli

This recipe is inspired by Healthyself‘s Cacao No-Grainola, but I have added oats because I like the way they fill me up, and they make the recipe stretch a lot further. The cacao makes it seem incredibly decadent, but it’s actually full of nutrition.  I like mine topped with almond milk and fresh berries. A little goes a long way…

muesli

4 tablespoons coconut oil

4 tablespoons rice syrup/honey/maple syrup

1 teaspoon vanilla paste

1/2 cup cacao powder

1 cup mixed nuts (Brazil, Hazelnuts, Walnuts, Pecans etc)

1 cup cashews

1 cup sunflower seeds

1/2 cup pumpkin seeds

1 cup coconut chips/flakes

1.5 cups wholegrain rolled oats. Make sure you use the large wholegrain ones and not the instant/quick cook porridge oats.


Preheat the oven to 170. Melt the coconut oil and rice syrup in the bottom of a large roasting dish. When liquid, mix through the cacao powder and vanilla paste.

Roughly chop the nuts, then add them to the dish with all the other ingredients. Using a big spoon or spatula, turn the mixture thoroughly so it it all coated in the cacao mix.

Bake for about half an hour, turning the mixture 3-4 times during cooking.

Creamiest Bircher Muesli Ever

There’s rarely a day I don’t start with some form of oaty breakfast; oats keep me full all morning and provide a great source of fibre. In fact, there is research showing that the fibre found in oats, beta-glucan, can lower cholesterol and help fight heart disease.

However, one bowl of muesli can start to taste a lot like another, so I like to mix it up with different ingredients and toppings. I hit on a winner today; using a 50/50 milk and coconut cream mix to soak my Bircher muesli overnight resulted in a thick, creamy muesli that tasted more like a dessert!

My muesli ingredients and ratios tend to change depending on what I have to hand, but always include wholegrain rolled oats, seeds, nuts and dried fruit. Here is a general idea of how I made this bowl of deliciousness. Feel free to use it as a guide and change it up to suit you. The important thing is to get organised the night before so the muesli has a chance to soak up all the liquid and get good and creamy.

bircher

Handful wholegrain rolled oats

Handful sunflower seeds

Handful pumpkin seeds

Handful macadamia nuts (or walnuts, almonds, brazil nuts etc)

1 tablespoon sesame seeds

2 tablespoons desiccated coconut or coconut flakes

4 dates, chopped (or a handful of sultanas)

1/2 teaspoon cinnamon

1/4 cup milk (dairy, soy, almond, whatever you like)

1/4 cup full cream coconut cream (I used Kara)

Fresh fruit for topping


Get this prepared before going to bed. Mix all the dry ingredients in a bowl, combine the milk and coconut cream and pour over the top. It should just cover the dry stuff, so you might need slightly more or less. Stir until well mixed and leave in the fridge.

In the morning, get the muesli out a few minutes before you want to eat, so it comes up closer to room temperature. If it looks a bit dry, stir through a bit more milk to loosen it. Top with your choice of topping: yogurt, sliced banana, fresh fruit, chopped nuts, dried fruit…I used fresh berries and an extra drizzle of coconut cream.


Smoked Chicken, feta and pomegranate salad

I have to share this salad I made tonight; it was delicious! I can’t really give a recipe because I just threw stuff in, but here’s the gist:

smoked chicken salad

One handful Soba noodles, cooked according to packet directions and drained

2 cups mixed lettuce leaves, ripped

1/2 cup broad beans, blanched and podded

handful snow peas, chopped

6 cherry tomatoes, halved

2 spring onions, chopped

100 grams crumbly Greek feta, roughly chopped/crumbled

1 smoked free-range chicken breast, chopped

handful walnuts, toasted

1 pomegranate

1/4 cup each raspberry vinegar and olive oil


Mix the noodles, vegetables, feta, chicken and walnuts in a bowl. Combine the vinegar and oil and toss through.

Cut the pomegranate in half and tap the back of each half to scatter the seeds all over the salad.

Season to taste with salt and pepper. That’s it!


Upgraded Honey Crunch

I don’t know why I bother asking the family what they’d like in the biscuit tins every week, because the answer is always something sugar-laden and dripping with icing (peppermint slice and afghans are popular requests). Needless to say, I never actually make said sugar bombs, but occasionally I try to devise a healthier version of a favourite to keep everyone happy.

Hence this improved version of Honey Crunch; not the ultimate health food but far lower in sugar and higher in fibre and than the original. It’s also gluten and dairy free. I’ve added buckwheat groats which provide flavonoids and various minerals, replaced the brown sugar and golden syrup with non-refined sugars, and substituted coconut oil for the butter. It’s surprisingly tasty and very moreish, and satisfies those sweet cravings without giving you a blood-sugar overload.

crunch

Upgraded Honey Crunch

1 cup buckwheat groats

2 cups rice bubbles

60 grams  + 1 tablespoon coconut oil

3 tablespoons honey

2 tablespoons rice syrup

1 teaspoon blackstrap molasses

1 teaspoon vanilla paste

1/2 teaspoon sea salt flakes

Melt the extra tablespoon of oil in a roasting dish, coat the buckwheat with oil and spread it out in a single layer. Bake at 180 degrees until golden, about 20 minutes.

In a large saucepan, melt the honey, syrup, molasses, coconut oil, vanilla paste and salt. Boil this for about 3 minutes or until it’s kind of frothy. It won’t make a caramel but it will combine.

Gently stir through the buckwheat groats and rice bubbles until combined, then press into a slice tin. I use a silicon one so it’s easy to get the crunch out. Refrigerate for several hours until set, tip out onto a chopping board and cut into slices.

Keeps in an airtight container for 3-4 days.